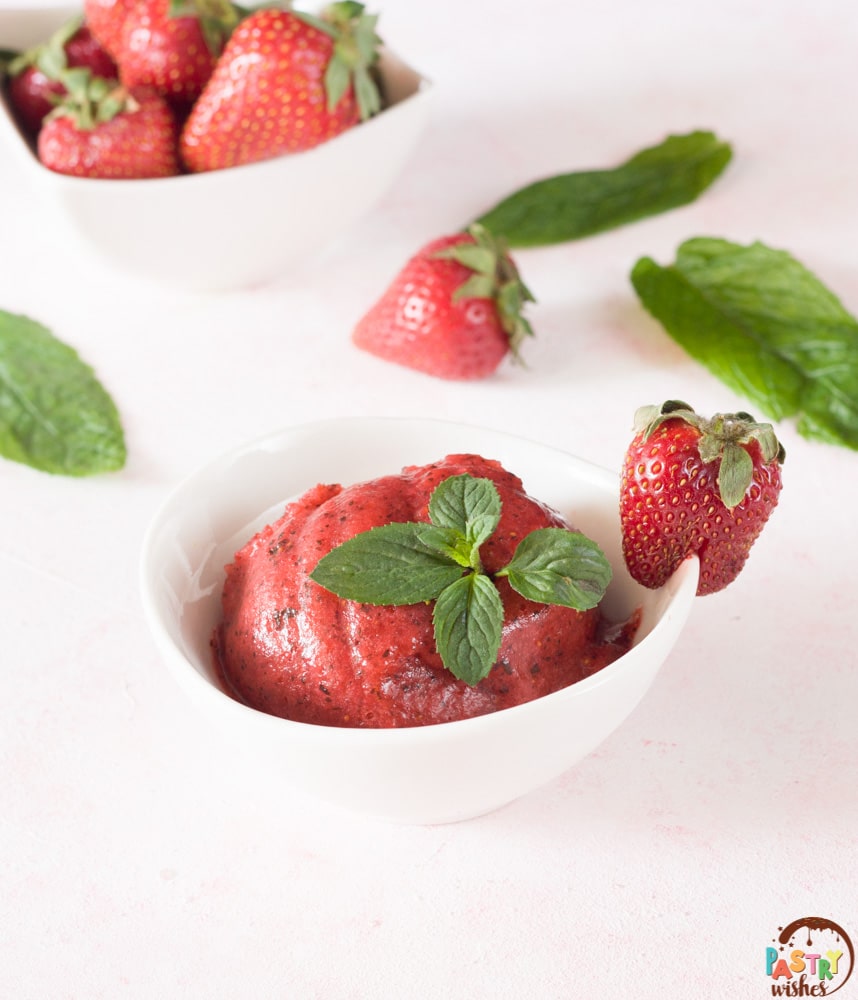
You don't need a fancy machine to make delicious ice cream at home! This homemade strawberry ice cream is creamy, refreshing and made with fresh strawberries. No eggs or ice cream maker required for this recipe!

I really love fresh strawberries, especially when they're in season! And fresh, homemade strawberry ice cream just can't be beat! It's one of my all-time favorites!
This recipe is adapted from my Easy No-churn Vanilla Ice Cream. It's smooth, creamy and packed with delicious strawberries!
Jump to:
- Why you'll love this recipe:
- WHAT MAKES THIS RECIPE STAND OUT FROM TRADITIONAL ONES
- What you'll need to make this recipe:
- FREQUENTLY ASKED QUESTIONS
- HOW TO MAKE HOMEMADE STRAWBERRY ICE CREAM WITHOUT AN ICE CREAM MAKER
- Ideas for Add-ins & Toppings
- WHAT ELSE TO MAKE WITH THIS HOMEMADE STRAWBERRY ICE CREAM
- TIPS FOR SUCCESS
- MORE ICE CREAM & FROZEN DESSERT RECIPES
- Recipe
Why you'll love this recipe:
- It's easy.
- It's egg-free.
- It's made without an ice cream maker!
- You only need 6 ingredients.
- It has a gorgeous, naturally colored shade of pink (without using food coloring)!

WHAT MAKES THIS RECIPE STAND OUT FROM TRADITIONAL ONES
First of all, what really makes this recipe different from most standard no-churn recipes is that there are 2 methods I use to prevent ice crystals forming.
The problem: Fresh strawberries create ice crystals when frozen.
I've tried recipes that ask to chop the strawberries and add them to the base, but I found that this creates a lot of ice crystals (especially if the strawberry pieces are big), as strawberries contain a lot of water.
The solution? Macerating the strawberries and then using a food processor.
- Macerating the strawberries first.
This simply means mixing the strawberries (in very small pieces) with sugar and a little bit of vodka and letting them sit for about an hour or two. During this time, the strawberries release their juices and create a beautiful syrup (which I drain and reserve as a topping). So, the result is a lot creamier and tastier, much like regular churned ice cream!
Why this works
If you've ever put vodka in the freezer, you'll notice that it never freezes! Adding a little alcohol to the base will prevent the ice cream from freezing solid. And although I don't taste any vodka, I think it enhances the overall texture, making it smoother.
2. Pulse the strawberry ice cream in a food processor.
In addition, for a creamier consistency similar to gelato, you take pieces of frozen ice cream and put them in a food processor and pulse until really smooth. Then put it back in the container, cover the surface with plastic wrap again and put it back in the freezer.
Why this method works
This method really makes the ice cream easier to scoop because it's so smooth. I also think that it produces the best overall, ultra-smooth texture. To me, this was the closest I got to making real churned ice cream at home without using a machine.
What you'll need to make this recipe:
Whipping cream: You need heavy whipping cream (or whipping cream with at least 35% fat).
Sweetened condensed milk: I use 1 can.
Vanilla: I use vanilla extract for this recipe, but I've also tried it with ground vanilla bean powder, too, which gives it a more pronounced vanilla flavor. I used the powder in my no-churn vanilla ice cream.
Sugar: I use regular granulated sugar.
Strawberries: I use fresh, ripe strawberries.
Alcohol: I use a small amount of vodka, because it makes it smoother and you don't taste it at all in the ice cream.

FREQUENTLY ASKED QUESTIONS
No. Sweetened condensed milk contains sugar, whereas evaporated milk does not have any sugar in it, so it can't be replaced in this recipe.
No, you won't get the same consistency and it will create a lot of ice crystals. You need fat to avoid this. The lower the fat in the cream, the more ice crystals you'll get.
You can store this in the freezer for about 2 ½ weeks.
HOW TO MAKE HOMEMADE STRAWBERRY ICE CREAM WITHOUT AN ICE CREAM MAKER

FIRST MACERATE THE STRAWBERRIES & WHIP THE CREAM
STEP 1
First, finely chop the strawberries. Then you add the sugar and the vodka and stir everything together. Then you let it sit for an hour or more.
STEP 2
Next, drain the strawberries. If you want, reserve the vodka syrup to pour over ice cream when it's done! It's really delicious!
STEP 3
After that, puree the strawberries in a food processor. You could also mash them with a fork, potato masher or pastry blender.
STEP 4
Then you need to whip the heavy cream until stiff peaks form.
NOW YOU'RE READY TO MAKE THE BASE

STEP 5
First, add the vanilla and sweetened condensed milk to the whipped cream and mix until combined.
STEP 6
Now add the puree and mix well.
THEN TOSS IN THE ADD-INS & FREEZE
STEP 7
After that, fold in the chopped strawberries or any other add-ins you may be using. Just make sure they're not too big.
STEP 8
Then pour into a freezer-safe container. I use a pyrex pan.
Finally, spread the top evenly. Then press the surface with plastic wrap and then cover the pan with some foil and freeze for at least 6 hours or overnight.
After that, you can put it in a food processor to make it creamier and then put it back in the freezer.
Ideas for Add-ins & Toppings
If you'd like a flavor boost, here are a few ideas for add-ins & toppings:
Add-ins
- fresh mint or basil leaves, about 2 tablespoons chopped
- dark chocolate chips
- nuts
- alcohol like brandy, cognac, champagne red wine, rum, grand marnier or even cointreau
- small pieces of cheesecake folded into the base would be delicious, instead of chopped strawberries
- pieces of your favorite cookies
Also, although I haven't tried it yet, I think my homemade strawberry jam swirled on top or INTO the base before freezing would be amazing!
Toppings
- Pour some of the reserved vodka syrup on top.
- Pipe some extra whipped cream over it!
- Drizzle some chocolate syrup or caramel over it.
- Top with sprinkles.
- Add some Oreo cookies on top.
- Serve with fresh fruit, jam or this delicious mandarin marmalade!
WHAT ELSE TO MAKE WITH THIS HOMEMADE STRAWBERRY ICE CREAM
There are lots of different ways you can enjoy this other than on its own. Here are a few other ideas:
- Make strawberry milkshakes!
Just blend it with a little milk for a really thick milkshake! If I'm feeling naughty, I'll add some chocolate sprinkles (and/or whipped cream) on top!
- Make smoothies!
Add some fresh fruit and milk and blend it all together.
- Make sundaes!
I used to LOVE sundaes when I was a kid! Just scoop some of this yummy ice cream in a bowl and go wild! Pour some luscious chocolate syrup on top, and add whipped cream, and some chopped nuts!
TIPS FOR SUCCESS
- I THINK THIS IS THE MOST IMPORTANT TIP: Use ripe strawberries that are in season! It will give you a much more flavorful ice cream! The riper the strawberries, the better!
- After I wash the strawberries, I put them on a paper towel and then pat them dry to absorb as much moisture as possible.
- Make sure the strawberries are cut into TINY pieces. Otherwise you'll be biting into large chunks of frozen fruit.
- I didn't add any sugar because my strawberries were very ripe and I felt the sugar in the sweetened condensed milk was just right. If your strawberries aren't that ripe, though, you may want to add a little sugar, about ¼ cup to the heavy cream while you whip it. I would taste the base before freezing it.
- Before whipping the cream, put a metal bowl in the freezer for about 15 minutes before adding the cream so that it whips faster.
- You need heavy whipping cream or whipping cream that contains at least 35% fat, otherwise it won't whip into cream.
- Put the can of sweetened condensed milk in the freezer for a few minutes before you start. Alternatively, you could put it in the fridge a day ahead.
- Store it in the coldest part of your freezer. I always keep it in the back and I avoid putting it in the freezer door.
- Let the ice cream sit at room temperature for about 10 minutes before serving to soften it up a bit.
Enjoy!
MORE ICE CREAM & FROZEN DESSERT RECIPES

Let me know how this easy homemade strawberry ice cream turns out for you in the comments below! I'd love to hear from you!
Recipe

Easy Homemade Strawberry Ice Cream Without an Ice Cream Maker (+ Tips)
Ingredients
For the puree
- 1 pound / 453 g fresh strawberries, rinsed, hulled, stems removed, finely chopped
- ¼ cup / 50 g granulated sugar
- ¼ cup / 60 ml vodka
For the base
- 2 cups (500ml) heavy whipping cream (or whipping cream with at least 35% fat)
- 1 pound / 453 g fresh strawberries, rinsed, hulled, stems removed and cut into tiny pieces
- 1 14-ounce (397 g) can sweetened condensed milk
- 1 teaspoon vanilla extract
Note:
For best results, please read through the full post before beginning the recipe.
Instructions
Macerate the strawberries
- Put the chopped strawberries, sugar and vodka in a small bowl.
- Stir everything together and let it sit for an hour or more.
Make the puree
- Drain the strawberries. (Reserve the vodka syrup to pour over ice cream when it's done!)
- Puree the strawberries in a food processor. You could also mash them with a fork, potato masher or pastry blender. Set aside.
Make the base
- In a large bowl, whip the cream until stiff peaks form.
- Add the vanilla and sweetened condensed milk and mix until combined.
- Add the puree to the base and mix well.
Toss in the add-ins & freeze
- Fold in the chopped strawberries or any other add-ins, if using.
- Pour into a freezer-safe container. I use a pyrex pan. Spread evenly on top.
- Then cover with plastic wrap and then some foil and freeze for at least 6 hours (or overnight).
- For a creamier consistency, take pieces of frozen ice cream and put them in a food processor and pulse until really smooth. Then put it back in the container, cover the surface with plastic wrap again and put it back in the freezer.
- This ice cream can be stored in the freezer for about 2 ½ weeks.
- Enjoy!
Notes
- Use ripe strawberries that are in season for a more flavorful ice cream. The riper the strawberries, the better!
- After I wash the strawberries, I put them on a paper towel and then pat them dry to absorb as much moisture as possible.
- Make sure the strawberries are cut into TINY pieces. Otherwise you'll be biting into large chunks of frozen fruit.
- I didn't add any sugar because my strawberries were very ripe and I felt the sugar in the condensed milk was just right. If your strawberries aren't that ripe, you may want to add a little sugar, about ¼ cup to the heavy cream while you whip it.
- Before whipping the cream, put a metal bowl in the freezer for about 15 minutes before adding the cream so that it whips faster.
- Put the can of sweetened condensed milk in the freezer for a few minutes before you start. Alternatively, you could put it in the fridge a day ahead.
- Store the ice cream in the coldest part of your freezer. I always keep it in the back and I avoid putting it in the freezer door.
- Let the ice cream sit at room temperature for about 10 minutes before serving to soften it up a bit.
Janet
Loved this ice cream!
Voula
I'm so happy to hear that, Janet!❤️