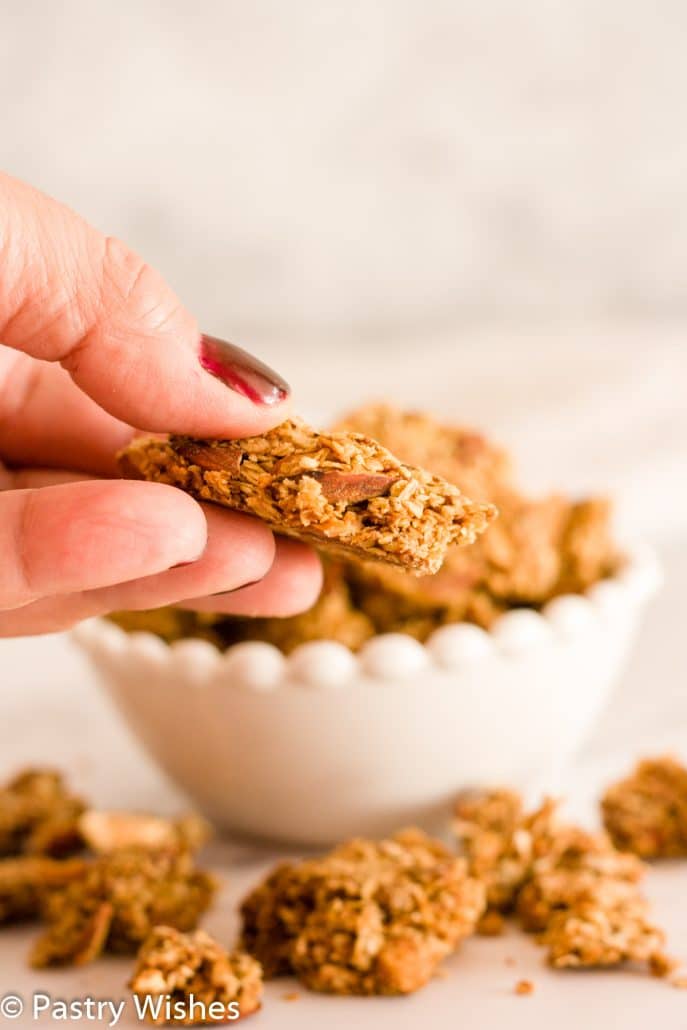
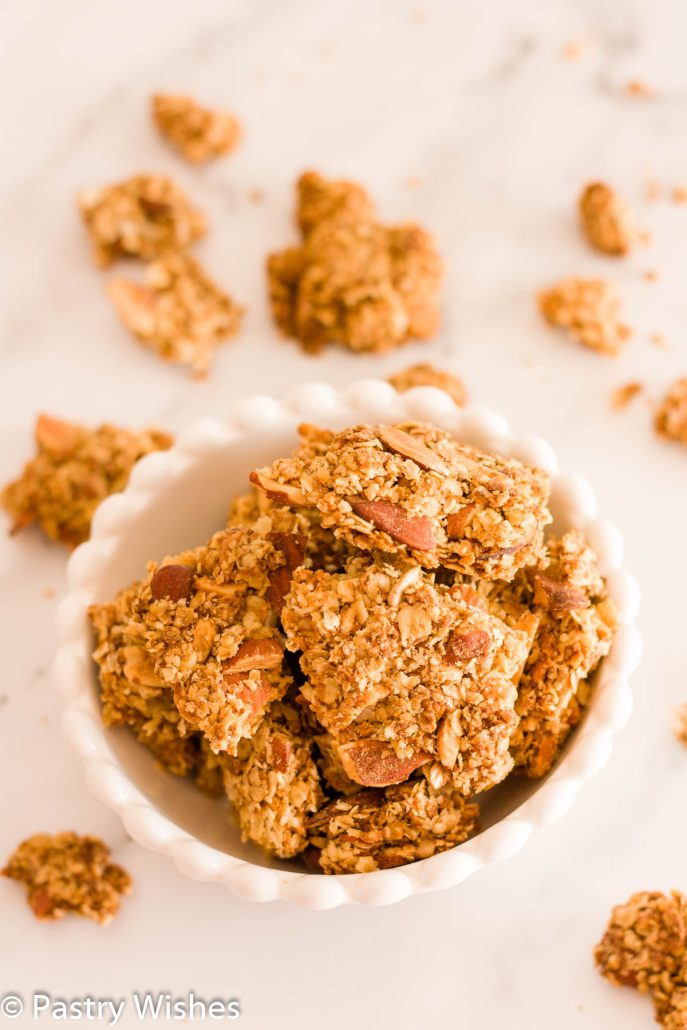
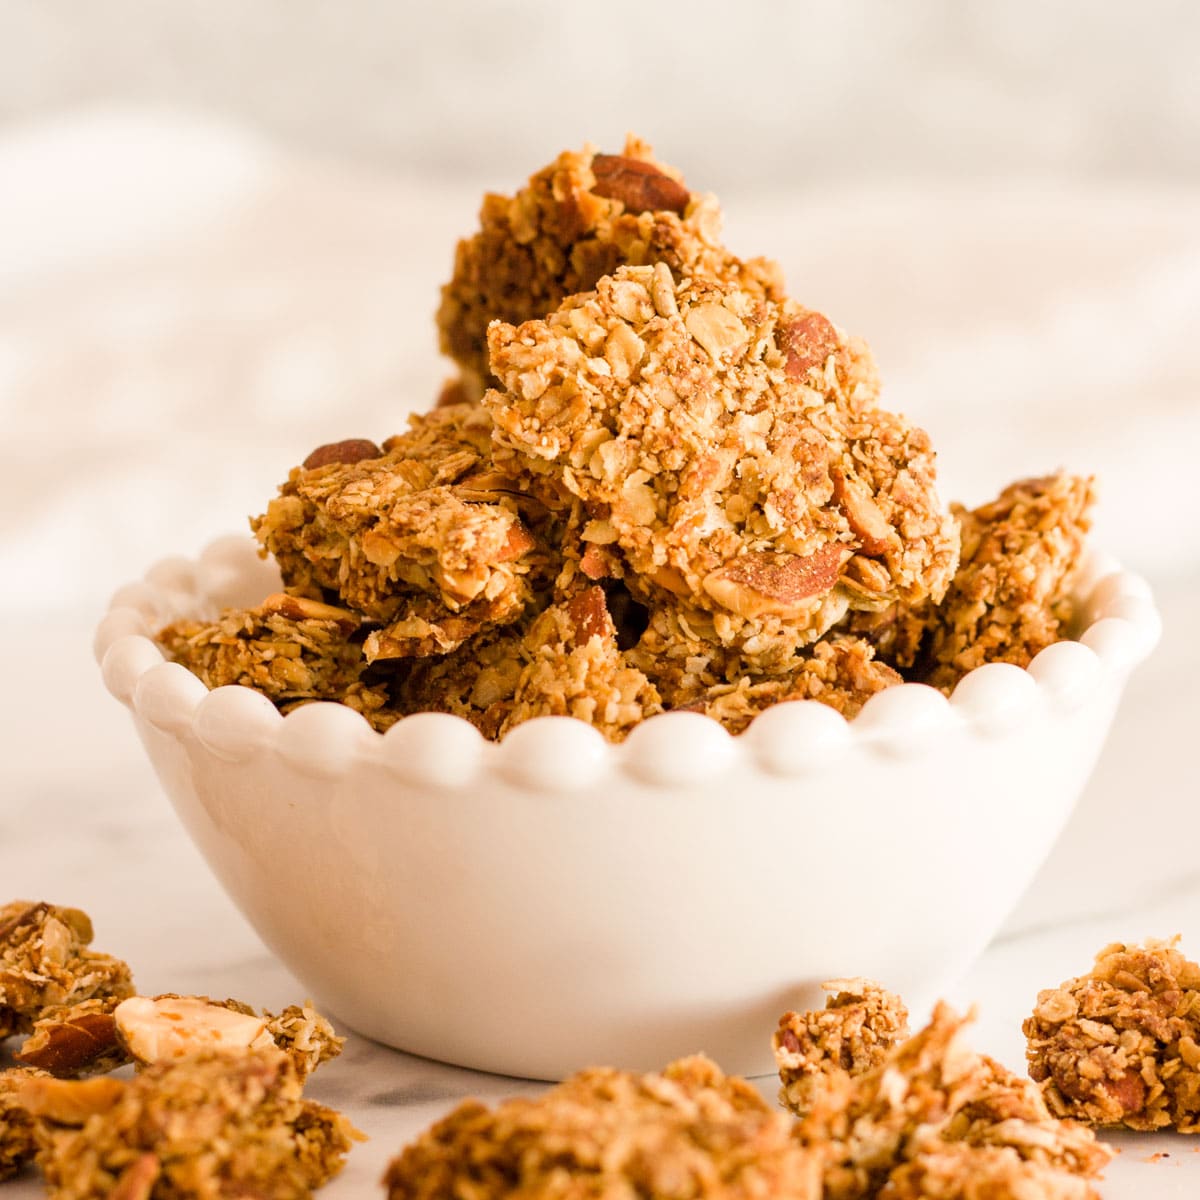
These homemade granola clusters are healthy, crunchy and delicious! They're chunky, easy to make, and taste so much better than store-bought!

I love granola, but because a lot of brands in stores have too much sugar and fat, I wanted to make my own.
This recipe is amazing! I make it quite often as it's a family favorite. That's why I wanted to share it with you, too!
I actually have a few healthy sweets and treats on the blog, like my Healthy Tahini Breakfast Cookies, my Pasteli Ancient Greek Sesame Bars, or my Easy Rose Bliss Balls.
This granola clusters recipe makes a wonderful healthy breakfast or snack. It's not overly sweet like store-bought, yet it's really simple to make.
If you've been looking for a chunky granola recipe, you've come to the right place! You'll love these crunchy, healthy granola clusters.
Honestly, these granola clusters are so good, I don't think you'll ever go back to buying store-bought again.
Jump to:
- Why you'll love this recipe
- What do these homemade granola clusters taste like?
- WHAT YOU NEED TO MAKE THIS RECIPE
- Granola Cluster Ingredients
- Equipment you'll need
- HOW TO MAKE HOMEMADE GRANOLA CLUSTERS
- Step-by-step instructions
- HOW TO MAKE GRANOLA CLUSTERS STICK TOGETHER
- Recipe Notes
- HOW TO SERVE HOMEMADE GRANOLA CLUSTERS
- VARIATIONS & ADD-INS
- TIPS FOR SUCCESS
- HOW TO TELL WHEN THE GRANOLA IS DONE
- FREQUENTLY ASKED QUESTIONS
- MORE HEALTHY RECIPES
- Recipe
Why you'll love this recipe
- It's simple. This recipe is so straightforward! Honestly, these easy granola clusters are almost effortless.
- It's flexible and customizable. What I love the most about this recipe is that it's easily adaptable. You can customize it the way you want. Love fruit? Add your favorite dried fruit or raisins. Don't like fruit? Add your favorite nuts, instead. The options are endless.
- It's healthy. This granola cluster recipe doesn't have any sugar at all, so it's super healthy. It is made with rolled oats, nuts, seeds, and honey. You could also make it with maple syrup.
- It tastes amazing. I used to think that making my own granola pieces would be really difficult at home and not taste as good as store-bought granola. However, this recipe for granola clusters proved me wrong. They are so good, they're practically addictive! I promise you that you won't be able to just eat one piece.
- It's cheaper than store-bought. You'll definitely save some money by making your own crunchy granola clusters.
- A great snack. These delicious granola clusters are absolutely perfect for snacking. I often can't stop nibbling on them! ?
- It's convenient. You can easily take these oatmeal clusters anywhere you want for a healthy snack.
- It freezes well. Easily freeze this granola for up to about 2 months!
- It's perfect for making food gifts. You can make cute gift bags with this recipe.
What do these homemade granola clusters taste like?
They're thick, crunchy, and just sweet enough, thanks to the honey. They also have a touch of cinnamon that pairs so well with all the other ingredients.
WHAT YOU NEED TO MAKE THIS RECIPE
Granola Cluster Ingredients
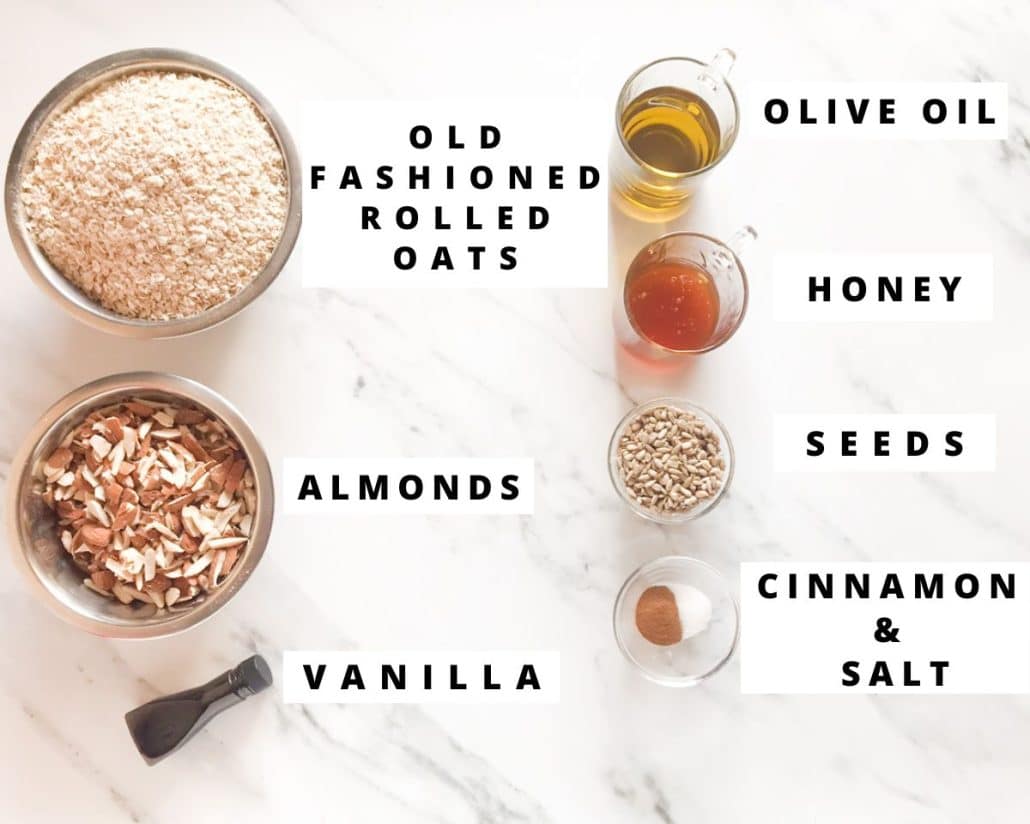
Oats: I use old fashioned rolled oats for this recipe.
Spices & salt: I use ground cinnamon and salt. The salt really binds all the flavors together.
Honey: I use organic Greek honey, but you could use equal amounts of maple syrup, instead. If you want sweeter granola, you can add some brown sugar, too.
Oil: I use extra virgin olive oil, but you could also use light vegetable oil or melted coconut oil. I love how the olive oil adds a nice toastiness to the granola.
Nuts: I use some sliced almonds, but you can use any nuts you like.
Seeds: I use sunflower seeds, but you could also use pine nuts, pepitas, flax seeds, or sesame seeds. If you're not crazy about seeds, just omit them.
Vanilla: I use pure vanilla extract.
Equipment you'll need
- mixing bowls
- a 10x15 inch (25 X 38 cm) jelly roll pan or baking sheet of similar size
- a silicone spatula
- parchment paper
HOW TO MAKE HOMEMADE GRANOLA CLUSTERS
Step-by-step instructions

First, line the pan with parchment paper. Then in a large mixing bowl, stir together the oats, cinnamon, nuts, seeds, and salt. Set aside.

In another bowl, whisk together the honey, vanilla and oil.

Pour the honey mixture over the dry ingredients and stir until everything is well combined. Make sure to coat everything well with the wet ingredients.

Spread the granola mixture onto the baking sheet, from corner to corner. Press it with a spatula to flatten it into a slab and help it stick together.

After that, bake the granola until it's a medium toasty golden brown color.

When it's done, let it cool and then use your hands to break it into clusters.
TOP TIP
If you don't want thick clusters, just stir the granola (without pressing down) every 10-15 minutes while baking.
HOW TO MAKE GRANOLA CLUSTERS STICK TOGETHER
I found that a combination of oil and honey helps everything stick together. Also, using a spatula to press the mixture into a slab in the pan from corner to corner makes perfect, thick clusters. Using a digital scale for accuracy is also important for this recipe.
Recipe Notes
Storage Tips
You can store this homemade granola in an airtight container at room temperature for up to about 2-3 weeks. I like putting it in jars. Don't store the granola in the fridge or it will get soft.
Freezing Tips
This granola freezes really well. Just store it in a sealed freezer bag or freezer-safe container. You can keep it in the freezer for about 2 months. To thaw, just leave it sit at room temperature for a couple of hours or in the fridge overnight. I sometimes freeze individual portions wrapped in plastic wrap.

HOW TO SERVE HOMEMADE GRANOLA CLUSTERS
- These tasty granola chunks are perfect to snack on! You can use them to top yogurt or smoothies or just add them to a bowl of milk for a nutritious breakfast.
- Of course, they are awesome on top of vanilla ice cream, too, with a drizzle of homemade salted caramel sauce or homemade chocolate syrup! These granola clusters are also delicious with homemade peanut butter!
VARIATIONS & ADD-INS
There are so many ways to make your own granola clusters using different variations and your favorite add-ins. Here are a few ideas you may want to try:
Make it vegan
Easily make this granola vegan by using maple syrup instead of honey.
Make it gluten-free
Although old fashioned rolled oats are naturally gluten-free, they could get cross-contaminated with gluten in the facilities they're made. So, just make sure the oats were processed in a gluten-free facility.
Make regular granola without clusters
Simply follow the recipe, but stir it a few times while baking, about every 10 minutes or so.
Make it sweeter
Add some brown sugar or chocolate chips for sweeter granola clusters. Let the granola cool a bit before adding the chocolate chips so that they don't melt.
Make it fruity
You can also add some dried fruit, like cranberries, blueberries, raisins, apricots, or strawberries. I usually add the fruit AS SOON AS the granola is done. Just take it out of the oven, spread the fruit on top and press it down so it creates a compact layer in the granola. Then let it cool completely before breaking into clusters.
Make it spicy
Instead of cinnamon, you could also add some ground ginger or pumpkin spice. I also think that cardamom or nutmeg would be good.
Add some more texture
You can use a variety of nuts and seeds. For example, shelled pistachios, chopped walnuts, macadamia nuts, pecans or peanuts. Feel free to add different seeds, too. I really love sunflower seeds, but you can use flax seeds, chia seeds, pumpkin seeds, or pepitas.
TIPS FOR SUCCESS
- Prevent it from sticking: Line the pan with parchment paper so the granola doesn't stick to the pan. You could also bake the granola on a silpat.
- Creating clusters: Evenly spreading the granola in the pan before baking will determine how thick or thin the clusters will be. I used my jelly roll pan for this recipe, which is 10x15 inches (25 X 38 cm).
- Bake at a low temperature: This will help it get nice and crispy. Also, the right temperature prevents burning.
- Don't stir: For perfect clusters, don't stir the granola at all while it's baking. Pressing it down and then letting it cool makes A HUGE DIFFERENCE in making beautiful clusters.
- Bake it evenly: Rotating the pan once while it's baking, helps the granola cook evenly all around.
- Ovens vary: Keep an eagle eye on while it's baking as it can burn quickly. You'll notice that the corners tend to brown first.
- Add fruit at the right time: If you're using dried fruit, don't add it before baking the granola because it will change the texture some fruit may also get too hard to chew.
- Give it time to cool: Before breaking it up into clusters, let the granola cool completely. It needs time to harden before you break it up. This could take anywhere from 45 minutes to an hour.
HOW TO TELL WHEN THE GRANOLA IS DONE
As soon as it turns light brown and has a slight toasty smell, take it out of the oven. The corners tend to brown first. Also, you need to watch it carefully because it can burn quickly. Keep in mind that it will still be a bit wet when you take it out of the oven, but it will dry and harden up as it cools.
FREQUENTLY ASKED QUESTIONS
I found that baking the granola at a low temperature helps make it crunchy without burning it or drying it out. Also, spreading it out and pressing it into a compact slab helps, too.
I think it's best to add dried fruit as soon as the granola is done and straight out of the oven. I just sprinkle the fruit on top and press it into a compact layer and then let it cool completely before breaking it into clusters. If you add the fruit before baking, it will add moisture and the granola might not get crispy and crunchy. Also, the fruit could get hard and may possibly burn.
This homemade granola lasts for about 2-3 weeks. You can easily store it in an airtight container or in jars at room temperature. You can freeze it, too, for about 2 months.
Enjoy!
MORE HEALTHY RECIPES


Let me know how these homemade granola clusters turn out for you in the comments below! I'd love to hear from you!
Recipe
Homemade Granola Clusters
Equipment
- mixing bowls
- a 10x15 inch (25 X 38 cm) jelly roll pan or baking sheet of similar size
- silicone spatula
- parchment paper
Ingredients
- 3 cups (255g) old-fashioned rolled oats
- 2 cups (250g) chopped almonds
- ¼ cup (30g) sunflower seeds
- ½ teaspoon salt
- 1 teaspoon cinnamon
- ¼ cup (60ml) olive oil
- ½ cup (125ml) honey
- 1 teaspoon vanilla
Before You Start:
For best results, please read through the full post before beginning the recipe.
Instructions
- Preheat the oven to 325°F / 165°C.
- Line the pan with parchment paper. Set it aside.
- In a large mixing bowl, stir together the oats, cinnamon, nuts, seeds, and salt. Set aside.
- In another bowl, whisk together the honey, vanilla and oil.
- Pour the honey mixture over the dry ingredients and stir until everything is well combined. Make sure to coat everything well with the wet ingredients.
- Spread the granola mixture into the prepared pan, from corner to corner. Use a spatula to press down on the mixture and flatten it into a slab that's an even layer. This will help it stick together. If you don't want clusters, just stir the granola (without pressing down) every 10-15 minutes while baking.
- Bake for 20 minutes and rotate the pan so that it will bake evenly all around. Bake for 10-15 minutes more, until it's golden brown. (The edges will brown first.)
- Keep an eye on it while it's baking as it can burn very quickly!
- Transfer the pan to a wire rack to cool completely. The granola will harden and dry as it cools.
- When it has completely cooled, use your hands to break the granola into clusters.
- Store in an airtight container at room temperature for up to about 2-3 weeks.
- Enjoy!
Tina
This recipe is amazing! Thanks for sharing!
Voula
I'm so glad you liked it, Tina!!
Tina
This is my go-to recipe for homemade granola! I've made it at least 4 times already and I've never had a problem whatsoever. I always measure my ingredients with a digital scale as Voula suggests and the granola always turns out great.
Voula
Thanks so much for your feedback, Tina!